This tutorial explains in short how to set-up a typical environment to develop Spring based applications. There is no prerequesite to this tutorial other then a working Windows XP client with sufficient CPU power and memory. During the tutorial we will need to install the following components:
- Java 6 JDK Update 26
- Eclipse IDE for Java EE Developers 3.6.2 (Helios)
- Maven 3.0.3
- Tomcat 7.0.14
I suggest that you create a folder where you drop all the stuff we need to set-up the environment. My Folder is C:\spring. I will call that <dev_home> when I refer to it.
Note: Setting up a Spring environment is possible in different ways. See here for example on how to setup a dynamic web project in Eclipse using Maven for dependency management. Combine it with this link on how to download Spring dependencies into Eclipse using Maven. However, I personally prefer to do a step-by-step installation of the separate components and integrate them myself. This way I learn a lot about how the tools work together and how to integrate them – and how to fix them when something is not working!
In this tutorial we will create a little demo project. It is the well known Spring MVC, Spring Core, JPA, Hibernate ("web container only") development stack that we use. This stack is used successful in many productive enterprise applications. The demo can be used to start development of your own enterprise project.
What you need first is - guess what - Java! You can download the Java JDK from here. Do not download NetBeans or Java EE. You do not need it. All you need is a Java JDK. So select the Java JDK download button. Then you select the download button for your operating system. For me that’s the good old Windows x86. You get Java as a self-extracting .exe-File. When the installer asks for the target installation directory, then make it <dev_home>/java.
What you do now is to install your integrated development environment. I prefer Eclipse for development. It has a huge community out there and all the stuff like Maven and Tomcat is integrated well with Eclipse. To download Eclipse perform the following steps:
- In <dev_home> create a subfolder called “eclipse”.
- Open your Web Browser.
- Go to Eclipse download page
- On the upper right, select the download link appropriate for your operating system. For me that’s Windows 32-bit.
- Follow the instructions to download the Eclipse ZIP-Package.
When you downloaded the Eclipse package, you can unzip it to <dev_home>/eclipse. After you unzipped Eclipse this installation is complete.
To start Eclipse you can double click the eclipse.exe file in the folder <dev_home>/eclipse. When you start Eclipse this way then what you get is the standard start up configuration. This can lead to some problems, e.g. out-of-memory exceptions. I suggest to start Eclipse with some start up parameters in a .cmd-File. The following listing shows my typical start up script:
@echo off
set DEV_HOME=C:\spring
set JAVA_HOME=%DEV_HOME%\java
set PATH=%JAVA_HOME%\bin;%PATH%
start %DEV_HOME%\eclipse\eclipse.exe -vm %JAVA_HOME%\bin\javaw.exe -showlocation -vmargs -server -Xms512m -Xmx1024m -XX:MaxPermSize=128m
Let’s create your own start up script:
- In the <dev_home>/eclipse folder, create a text file called eclipse.cmd.
- Place the listing above into the file, save the file and close it.
- To start Eclipse, double click the eclipse.cmd file.
If everything works, then you get the following screen:
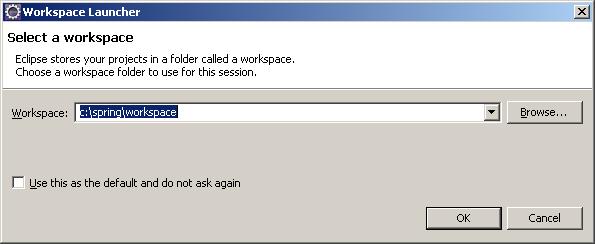
In Eclipse all your development sources are placed into Eclipse projects. All the projects are in your workspace. Here you can enter the directory where Eclipse creates the workspace
- Enter <dev_home>/workspace into the "Workspace" field.
- Press "OK" button.
You get the following screen in Eclipse if everything worked out.

From here you do the following to get your Eclipse ready to develop applications.
- Choose Window/Close Perspective in the menu bar.
- Choose Window/Open Perspective/Other in the menu bar.
- Select the Java EE perspective and click “OK”.


For now we leave Eclipse ‘cause there is other stuff to do. To close Eclipse select File/Exit in the menu bar.
In this tutorial we use Maven 3 to set-up the Eclipse project. Maven is very easy to use here. There are other alternatives when it comes to lifecycle tooling, e.g. Gradle or ANT. I still use ANT a lot because I like to have full control over things. However, for the sake of simplicity in this tutorial we use Maven 3 because it makes standard project setup very easy. To get a copy of Maven 3 do the following:
- Go to Maven download page.
- Select the Mirror apache-maven-3.0.3-bin.zip (for Windows).
- Select the Mirror where you want to download the copy.
- Extract the ZIP-File into <dev_home>/maven.
“Maven will run with sensible defaults, so you can get right into it. However, if you are operating under a restricted environment or behind a firewall, you might need to prepare to run Maven, as it requires write access to the home directory (C:\Documents and Settings\username\.m2 on Windows) and network access to download binary dependencies." See here on how to configure a proxy server. (from the Maven manual)
Now after we downloaded and extracted Maven, we can use it. Do the following:
- Start a command prompt window
- Go to <dev_home>/workspace
- Set the PATH variable as follows: set PATH=<dev_home>\maven\bin;%PATH%. Do not forget to replace <dev_home> with your development environment home directory.

- Type mvn --version. Maven should now talk to you and answer something like this:

- Now we are ready to create the Eclipse project. Maven uses archetypes that set-up a complete project for you. There are lots of archetypes available. To get a list just enter mvn archetype:generate. This will start an interactive batch utility where you can see all the archetypes that Maven supports out of the box. Because we know that we want to create a Spring project we don’t need interactive mode. Type in the following to create the Spring project:
mvn archetype:generate -DarchetypeGroupId=org.fluttercode.knappsack -DarchetypeArtifactId=spring-mvc-jpa-demo-archetype -DarchetypeVersion=1.1 -DgroupId=com.mycompany.springapp -DartifactId=my-spring-app -Dversion=1.0-SNAPSHOT -DinteractiveMode=false

- In your <dev_home>/workspace folder there should now be a new folder called my-spring-app. Change into that directory.
- Open the pom.xml file to see the dependencies of your project. The pom.xml file is Maven’s main configuration file. All that’s specified as project dependency here is downloaded by Maven. In fact, Maven also checks if you have transitive dependencies because it analyzes the dependencies of your direct dependencies. This way, you don’t have the burden to stick the stuff together manually. Thank god for this very helpful feature!
- In the command prompt enter the following Maven command: mvn eclipse:eclipse. This will generate a complete Eclipse project into the current folder. It will take its time, because Maven downloads all the dependent libraries you need to run your Spring application. You can really go and take a coffee now. If everything worked, then you see the following at the end of the Maven console output:

Now you’re done, in terms of creating the Eclipse project with all the Spring dependencies.
Note: You noticed that Spring downloaded a lot of stuff to get all the things running. Spring provides lots of features and is very downwards compatible. Many people complain because it’s not lightweight anymore. They refer to exactly this list of dependencies. My opinion is that there is no alternative. Other approaches do exactly the same, but just behind the scenes. Often, if something goes wrong then, you don’t know why. When you use Spring at least you know your dependencies, you know what you get and need. There is nothing hided. I prefer to understand exactly this technical stuff so I can help myself if something goes wrong.
Note: If you are setting up a Java EE 6 environment then continue in the Java EE 6 tutorial. The rest of this tutorial here is specific to Spring set-up.
Adding the new project to Eclipse workspace
We have got to make the project visible to Eclipse. Perform the following steps.
- To open Eclipse, go to <dev_home>/eclipse and double click eclipse.cmd.
- If the Workspace Dialog appears then make sure you select the correct workspace under <dev_home>/workspace. Press “OK”.
- In Eclipse select File/Import from the menu bar.
- In the Import Dialog select “Existing Projects into Workspace” and select “Next”.

- Select <dev_home>/workspace/my-spring-app as your root directory for the project.

- Press “Finish”.
The Project will be imported. When the import is finished you will recognise that the “Marker” view at the bottom shows various errors and warnings.

Right now, Eclipse does not know where Maven placed the Spring libraries (JAR-files). When you downloaded the dependencies that are specified in pom.xml file, Maven placed the jar-files into the local repository. Now, Eclipse – by default – does not know where this Maven repository is on your local machine. Therefore Eclipse cannot build the project. As a result the “Markers” view at the bottom shows various error messages.
You can easily set the missing environment variable using Maven. To do that, do the following:
- Close Eclipse with File/Exit from the menu bar.
- Go to the command window we have opened previously.
- Type in: mvn -Declipse.workspace=<dev_home>/workspace eclipse:add-maven-repo. Press enter. Maven will now create the variable for you.


- Open Eclipse again (double click on <dev_home>/eclipse/eclipse.cmd)
- In Eclipse select Project/Clean in the menu bar, then select “Clean all Projects” and press OK in the dialog box. Eclipse will recompile the sources now. Remember this, you will need it once in a while when you work with Eclipse.
The build path errors disappeared in the “Marker” view.

If you work behind a firewall, Eclipse cannot access the internet to validate the syntax of some XML-files. You need to configure the proxy settings.
- Go to Window/Preferences from the menu bar.
- On the Preferences Tab go to General/Network Connections.
- Set "Active Provider" to "Manual" and make the changes in the selected proxy settings.

This again should decrease the number of warnings in the Marker view.
Ignore the other warnings for now. Everything will work out fine.
Installing Tomcat 7
Next you need a container where you can deploy your spring application. I use Tomcat as the container for local development.
- Go to Tomcat download page.
- Download the 32-bit Windows ZIP-File.
- In your <dev_home> folder create a new “tomcat” folder and extract tomcat there.
- Go to Eclipse Workbench.
- In the menu bar select Window/Show View/Servers
- Right click into the view and select New/Server from the context menu.

- In the New Server dialog select Apache/Tomcat v7.0 Server and click “Next”.

- In the next dialog enter <dev_home>/tomcat as installation directory. Click “Next”.

- On the next page select my-spring-app and click “Add” to configure that Eclipse uses the new Server as runtime container. Select “Finnish”.

Now Eclipse is configured. It knows that you use Tomcat 7 as web container and your new Spring application will be deployed properly to test it in your local environment.
Note: “Eclipse forgets to copy the Tomcat default apps (ROOT, examples, etc.) when it creates a Tomcat folder inside the Eclipse workspace. Go to C:\apache-tomcat-7.0.8\webapps, R-click on the ROOT folder and copy it. Then go to your Eclipse workspace, go to the .metadata folder, and search for "wtpwebapps". You should find something like your-eclipse-workspace\.metadata\.plugins\org.eclipse.wst.server.core\tmp0\wtpwebapps (or .../tmp1/wtpwebapps if you already had another server registered in Eclipse). Go to the wtpwebapps folder, R-click, and paste ROOT (say "yes" if asked if you want to merge/replace folders/files). Then reload http://localhost/ to see the Tomcat welcome page.” (from: coreservlets.com)
Starting and using the demo application
You can test your installation now. What you do is the following:
- In Eclipse start your Tomcat Server. Go to “Servers” View.

- Select the Tomcat server and right click into the context menu.
- Select “Debug”. This will start the Tomcat server in debug-mode. You can see the server log coming up in Eclipse.
- Select “Console” View and notice that Tomcat talks to you. Make sure you don’t see any exception traces here.

- Now since Tomcat has started, open your Browser and go to: http://localhost:8080/my-spring-app
- This will open your Spring application. Play around a little.

You’re done! You have installed and started a typical Spring development environment. This set up will be the prerequisite for my subsequent Spring tutorials. I will introduce you to the different features of the Spring Framework.
Some errors that you may have and the solution
You can set the Target Runtime in the Eclipse project to the server which will execute the web application (e.g. for JSF: Glassfish) and Eclipse will then load the required libraries from there.
Go to “Project -> Properties -> Targeted Runtime” and select your runtime.
Some errors that you may have and the solution
Can not find the tag library descriptor for “http://java.sun.com/jsp/jstl/core”
You can set the Target Runtime in the Eclipse project to the server which will execute the web application (e.g. for JSF: Glassfish) and Eclipse will then load the required libraries from there.
Go to “Project -> Properties -> Targeted Runtime” and select your runtime.

Thanks. Great Article!!
ReplyDeleteAwesome post. I like the step by step description from the very beginning. Keep on going posting such stuff.
ReplyDeleteThanks mate!
My favorite tutorial/get started publication for Spring/Hibernate. I've tried 6 so far. Very logical and clear, I've learned a few things during the process. Thank you, Niklas!
ReplyDeleteI am facing maven issue last two day & using eclipse maven plugin. but it's get resolve my issue.
ReplyDeleteIt's really awesome article,Thanks to Niklas Schlimm
nice job!
ReplyDeleteThis tutorial worked perfectly even if I did it on Linux/Ubuntu (taking the softwares accordingly) with newer versions java 7 & eclipse 3.7, nevertheless this was exactly what I was looking for.
ReplyDeleteGood One. As per my experience for web applications Netbeans is much better , it also has integrated support for Maven. By the way I have also shared my experience with Spring as doing LDAP Authentication using Spring Security, you may find useful.
ReplyDeleteCould you explain a little why Java EE is not needed ? Is it because we are not using the EE libraries ?
DeleteThanks
Hi! There's no JEE server required here, all you need is Tomcat. But you always need 'some' JEE libs to run a web application nowadays, e.g. Servlet API.
ReplyDeleteCheers
Niklas
awesome
ReplyDeletehello nice tutorial however not much helpfull in my case...
ReplyDeleteI wonder if someone has any idea why after creating project like described above by using m2e and selecting spring-mvc archetype Im not able(since some time) run it on server ?
Theres simply no such option like run on server when i select "Run as" lol...
Hi there, I don't use m2e because I always have problems using it. Therefore I prefer plain Maven on the command line like explained. Maybe you'll find some m2e expert that can help.
DeleteGood luck!
Cheers,
Niklas
Thanks a lot mate. Great Article!!!
ReplyDeleteGreat one. Really helped me.
ReplyDeleteExcellent article, I'd never used Maven before to download all the dependencies, I can see it's a big time saver. How does the build process know to create your Person, DAO and controller classes however? And how does it know which database to run?
ReplyDeleteHi, great tut. But it doesn't seem to work on my machine. I get a warning and a 404 when going to the url:
ReplyDeleteWARN : org.springframework.web.servlet.PageNotFound - No mapping found for HTTP request with URI [/my-spring-app/spring/] in DispatcherServlet with name 'appServlet'
And the 404 says "The requested resource () is not available.
Could you please help?
Thanks in advance!
Hello Niklas,
ReplyDeleteYou have a very good blog. I will make sure to visit you more often.
I was doing a compare of tutorials in this category, as my preferred way to teach this to people previously exposed to some Spring (maybe 2.5, ...) is a little bit different:
I start generating all the structure with a Simple Spring Roo command, and once that one is clear, I prefer to build on that, removing the Roo stuff/noise.
Anyway, a great tutorial but I want to signal a minor but BLOCKING issue (I noticed that in many other tutorials that are introducing using Maven):
In a fresh new Eclipse you must setup a classpath variable called M2_REPO:
Java -> Build Path -> Classpath Variables and point it to the folder where Maven downloads all the libraries, usually \.m2\repository.
I think your Eclipse already had variable this previously set :).
Anyway a great intro, although I suggest to your readers to try Spring Roo as an alternative start, even if they do not plan to stay on it for future development.
Cheers,
Ionel Condor, Cluj-Napoca, Romania.
Hi! Thx for the comment. The M2_REPO variable is set using the eclipse:add-maven-repo command like explained in the tutorial ...
ReplyDeleteCheers,
Niklas
Great work..!
ReplyDeleteThis sample will not work in JBoss
ReplyDelete